It has gotten a little girly on this blog with Lauren's posts about engagements and pumpkins, though I admit I'm to blame for both.
I thought I'd share some of the woodwork I've done since moving in. This might turn into a little hobby of mine. Since doing this stuff I've gotten better tools and bigger ideas.
Firstly, when we were building the house our neighbours led us to believe they never need to use the air-con in this area, so we didn't plan for that. It was a particularly hot summer, but we're also particularly wimpy when it comes to the heat. At about christmas time we caved and bought an in-window air con. We weren't going to splash out on central air, which we would love, but we also didn't want to install a split system if we would eventually want central air.
An in-window air con is cheap and non-destructive... just pop it in the window and switch it on, right? WRONG!
It seems the people who make air-conditioners assume you will cut an air-con sized hole in the side of your house... i.e... the "window". It doesn't come with any kind of bracket or anything that would enable you to put it into an actual window.
Well I would have to come up with something, so out of necessity I spent a few days on the floor of the garage, in my underwear, dripping with sweat as I rushed to build a frame we could use to mount the air-con into our en-suite window.
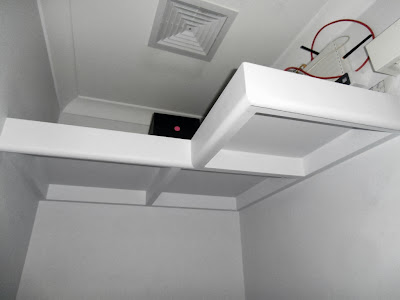
It's quite elaborate and uses a lot of timber, but I never took any good photos of it. It fits into the window frame on the inside, and holds the air-conditioner in a hole as well as having bars out the back that take the weight of the air-conditioner and cantilever it into place.
 |
| Air-con frame in en-suite |
That is literally the first woodworking DIY project I've ever done, and I only did it because I was so uncomfortable in summer. However the sense of accomplishment has got me thinking about more things we can do ourselves, maybe some more permanent things...
The big project we've been working on is retaining walls, which is something we might be doing for a few years here and there. We started by building small walls around a tree, ultimately when we fill the area around the tree, it will help the tree survive by allowing it to keep it's original soil level around the base of the tree.
 |
| Retaining walls always start with heaps of digging and measuring. |
 |
| Kookaburras freaking love you when you're gardening. You constantly dig up worms or overturn rocks and reveal a centipede... I always try to signal my approval to them for finding the snack, but they do scare you when they almost land on you to get at a bug. |
 |
| I wet the holes before concreting. Also please understand that I'm using a hose in this picture. |
 |
| Our first foray into constructing walls used the technique of putting the upright supports in first.... |
 |
| ...trying to keep everything aligned with some string as a guide... |
 |
| ...and then adding the sleepers that go across. |
 |
| I also use some geofabric and drainage gravel to take some pressure off the wall. Not much is needed here. |
Our main reason for getting into retaining walls is to stop erosion on our ridiculously scary embankment. I'd like to eventually do levels so we can have several garden wall sections. Lauren's brothers helped us get started one day, showing us a different technique of screwing timber together prior to concreting - it helps to get the level of the top horizontal piece perfect, which is the most obvious thing you'll see if there is a problem with levels.
 |
| Here you can see the embankment between our tanks and house. |
 |
| Things got a little carried away here and too much timber was screwed together before being concreted, that made it very hard to push the wall into place. (I just cringed because I remembered the back pain) |
 |
| Most of the time was spent on digging out large rocks. This particular one is so big it couldn't be lifted or levered out of the hole. I wound up digging another hole next to it and shoving it over. I crushed my hand a few times on this one too. |
 |
| Before and after photos of a rock I angle grinded out of the way bit by bit like a mango. |
 |
| It took 2 diamond blades and 8 hours (over 2 weeks), and a lot of vigilant supervising by Lauren in case the blade shattered and broke my face. |
 |
| Looking down from the house. |
 |
| I mixed the concrete by hand in a wheelbarrow. *cringe* more backpain... |
 |
| A pretty retaining wall needs a pretty dress. Not really.. this is geofabric to allow water to pass through but not let the dirt rest directly on the wall. It takes a lot of pressure off the wall and helps the timber last longer. |
 |
| I've also partially backfilled with gravel for drainage. Once more soil is in there I'll do a bit more gravel up higher. |
 |
| A section of completed wall. |
 |
| This picture shows the slotted agpipe wrapped in the bottom of the geofabric, for better drainage. |
 |
| Those kookaburras can't get enough of my work. |
And finally, when we moved in I put up a cheap shelf in the store room for the network equipment. I had a contractor in fixing a bad connection a couple months ago and he must have pulled his fat arse up using that shelf because after he left all the screws had popped out and that thing was barely hanging on. I needed a final solution that nobody could pull down. I reckon you could climb onto this and sit on it, but I don't think I'll try.
 |
| I stole the style of design from the way our pantry is built. However I used much larger and stronger timber. |
 |
| This thing is anchored into the studs on 3 sides in several places, some using 100mm screws. It is mostly butt-joined but there was one lap join necessary which makes me very proud. |
 |
| This shelf is now big and strong enough for me to add a big meaty UPS and a server. |
 |
| And this all lives up in the end of the store room. |
I'll try to do more DIY posts in the future!


Excellent DIY-ing! Looks like a tough work, but you managed to pull it off with a little help. Great thing you love woodwork and you know a lot about air conditioners; they are quite the necessity these days. I’ll look forward to see more of your DIY projects in the future. Day Aire
ReplyDeleteWhile it's a common notion that in-window ACs are easy to install, it simply isn't the case all the time. Good thing you did not experience that much of a hassle while doing this. Your skills in woodworking definitely came in handy for this project. Anyways, thanks for sharing!
ReplyDeleteTommy Hopkins @ AccuTemp